
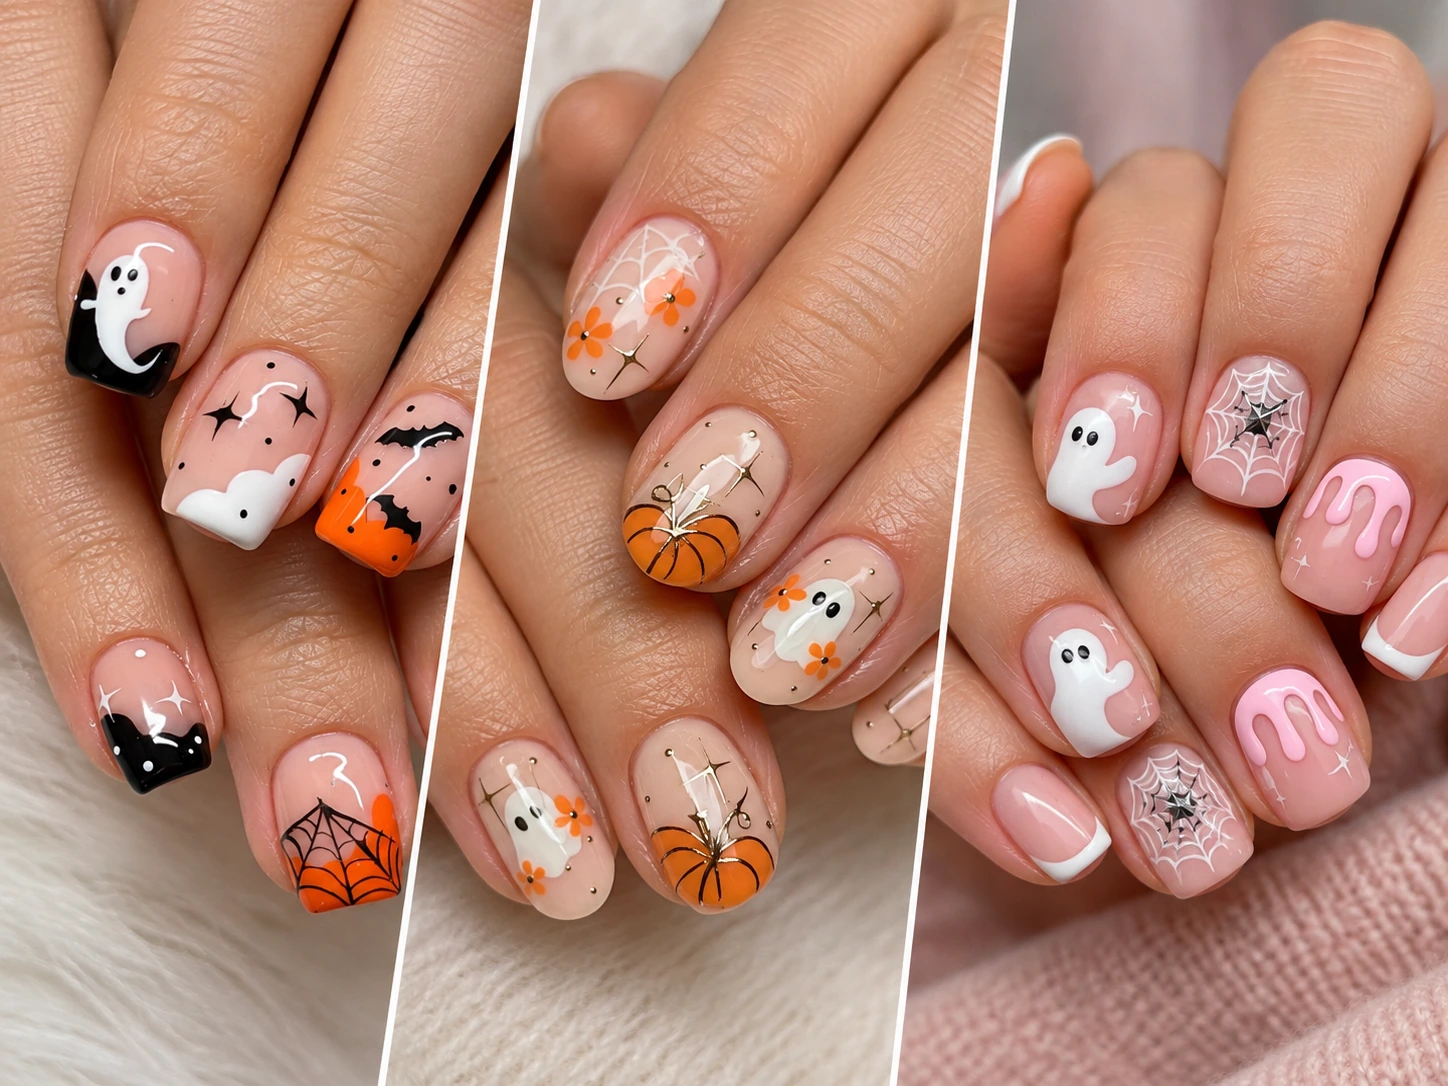
Short Halloween nails are the easiest way to join spooky season. They are quick to paint, they do not break easily, and they still leave plenty of room for ghosts, pumpkins and spider webs. You do not need long nails to get a fun Halloween manicure.
We picked these 15 designs from talented nail artists on Instagram. We chose each one because it has clear Halloween details, looks great in real life, and can be copied at a salon or at home on shorter nails. For every idea, you will see what the design is, who it suits best, and simple steps to recreate it.
☰ Jump to an idea15 ideas
- 1. Matte Black and Red Ombre Nails
- 2. Milky White Nails with Smoky Black Edges
- 3. Halloween Confetti Nails
- 4. Ghost French Tips
- 5. Red Chrome Drip Nails
- 6. Pink Ghost and Drip Nails
- 7. Pumpkin, Ghost and Flower Nails
- 8. Black, White and Orange Halloween Tips
- 9. Retro Fall Ghost Nails
- 10. Summerween Nails
- 11. Mummy, Pumpkin and Stitched French Nails
- 12. Deep Plum Nails with a Halloween Accent
- 13. Candy Corn Swirl Nails with Ghosts
- 14. Ghost Tips with Gold Chrome Stars
- 15. Black Spider Web and Blue Ghost Nails
Key Takeaways
- Nude and sheer pink bases work best on short nails. They make tiny Halloween art stand out and hide regrowth as your nails grow.
- Ghosts, spider webs and pumpkins are the easiest motifs. They are simple shapes that still look clear on a small nail.
- You can skip nail art completely. A matte black and red ombre or a deep plum shade feels spooky with no drawing at all.
- Accent nails save time and money. Paint art on one or two nails and keep the rest in a solid color.
- Long designs can be shortened. Keep each motif small and place only one or two on each nail.

All 15 Short Halloween Nail Ideas at a Glance
| Design | Vibe | Skill level |
|---|---|---|
| Matte Black and Red Ombre Nails | Moody | Easy |
| Milky White Nails with Smoky Black Edges | Eerie | Medium |
| Halloween Confetti Nails | Playful | Advanced |
| Ghost French Tips | Cute | Medium |
| Red Chrome Drip Nails | Spooky | Advanced |
| Pink Ghost and Drip Nails | Cute | Medium |
| Pumpkin, Ghost and Flower Nails | Cute and fall | Advanced |
| Black, White and Orange Halloween Tips | Classic | Medium |
| Retro Fall Ghost Nails | Retro | Medium |
| Summerween Nails | Fun | Advanced |
| Mummy, Pumpkin and Stitched French Nails | Playful | Medium |
| Deep Plum Nails with a Halloween Accent | Classy | Easy |
| Candy Corn Swirl Nails with Ghosts | Artsy | Advanced |
| Ghost Tips with Gold Chrome Stars | Cute and sparkly | Medium |
| Black Spider Web and Blue Ghost Nails | Gothic | Medium |
1. Matte Black and Red Ombre Nails
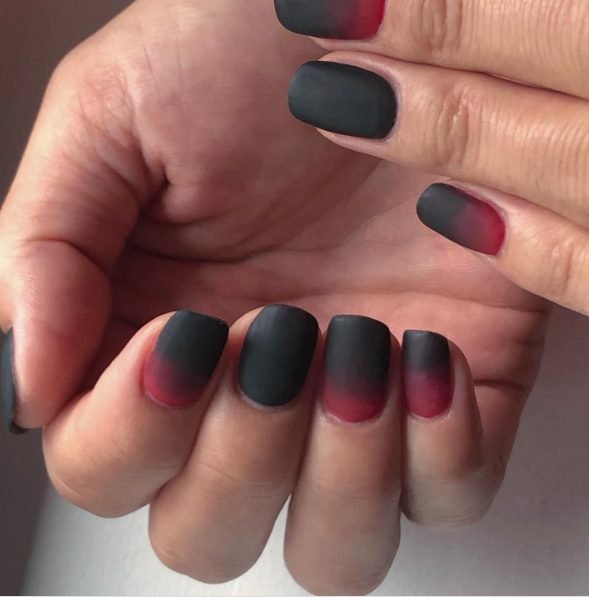
These short, squoval nails fade from matte black at the tips to deep red near the cuticle. The matte top coat makes the colors look soft and velvety, almost like smoke. There is no drawing at all, so the look is simple but still dark and spooky.
Best for: anyone who wants a moody Halloween look that also works at the office.
Recreate it:
- Paint every nail red and let it dry.
- Dab black polish onto a makeup sponge and press it onto the top half of each nail.
- Press a few more times, moving a little toward the middle, so the two colors blend.
- Clean the skin around your nails with a small brush dipped in remover.
- Finish with a matte top coat.
Make it work for you: This design is already made for short nails. Matte finishes show wear faster, so add a fresh layer of matte top coat every few days. For a softer version, swap the black for a dark plum.
Design source: @marnaenaenails
2. Milky White Nails with Smoky Black Edges
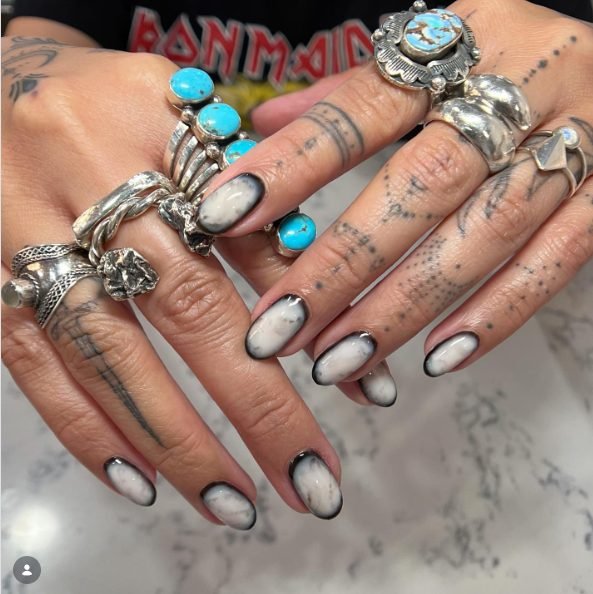
These oval nails have a milky white center with a soft black edge that looks like smoke creeping around the nail. The result feels ghostly, like an old haunted photo. A very glossy top coat makes the white look almost like glass.
Best for: people who love eerie, arty looks without any cartoon characters.
Recreate it:
- Apply a milky white gel or builder gel and cure it.
- With a thin brush, paint a black line around the edge of each nail.
- Before curing, soften the inner side of the line with a clean brush so the black fades into the white.
- Cure, then finish with a glossy top coat.
Make it work for you: On short nails, keep the black border thin so the white center still shows. Round and oval shapes suit this look best.
Design source: @marnaenaenails
3. Halloween Confetti Nails
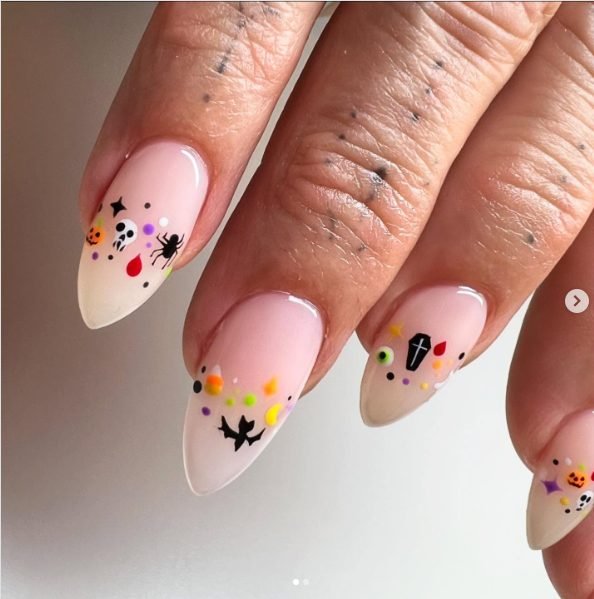
This design looks like Halloween party confetti fell onto sheer pink nails. Near each tip, you will find tiny skulls, pumpkins, a spider, a bat, a coffin, an eyeball, black stars and red drops. Bright dots in orange, yellow, green and purple fill the gaps.
Best for: anyone who loves lots of detail and bright color.
Recreate it:
- Paint a sheer pink base and cure or let it dry.
- Paint tiny motifs near the tip with a fine detail brush, or use Halloween nail stickers.
- Add small colored dots around the motifs with a dotting tool.
- Seal everything with a glossy top coat.
Make it work for you: The photo shows long pointed nails. On short nails, choose three or four tiny motifs per nail and group them near the tip. Stickers make this design much faster for beginners.
Design source: @handjobsbyallison (original design by @bugnails)
4. Ghost French Tips
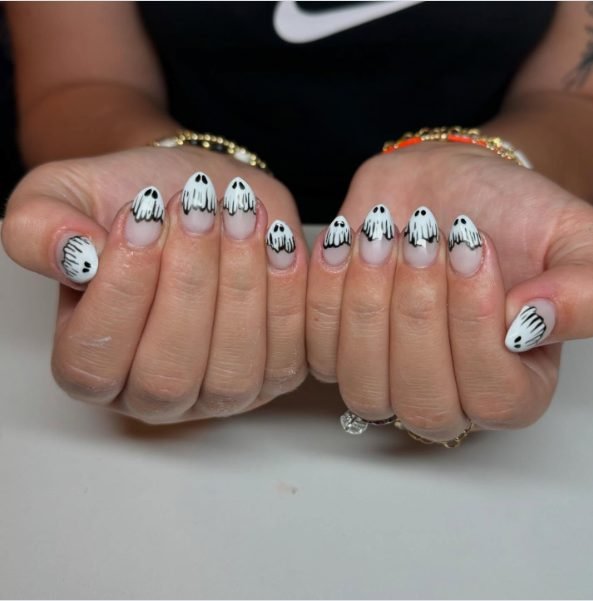
Here, the classic French tip turns into a row of little ghosts. Each white tip has two black dot eyes and a wavy black outline along the bottom that looks like a ghost’s floaty sheet. Each thumb is painted fully white with black lines to make a bigger ghost face.
Best for: anyone who wants a cute look that is still clearly Halloween.
Recreate it:
- Paint a sheer nude base.
- Paint a white French tip with a wavy bottom edge.
- Outline the wavy edge with a thin black liner and add a few short drips.
- Dot two black eyes onto each tip.
- Finish with a glossy top coat.
Make it work for you: This look is perfect for short nails. On very short nails, keep the white tip thin so the nail does not look even shorter.
Design source: @nailsbyemmach
5. Red Chrome Drip Nails
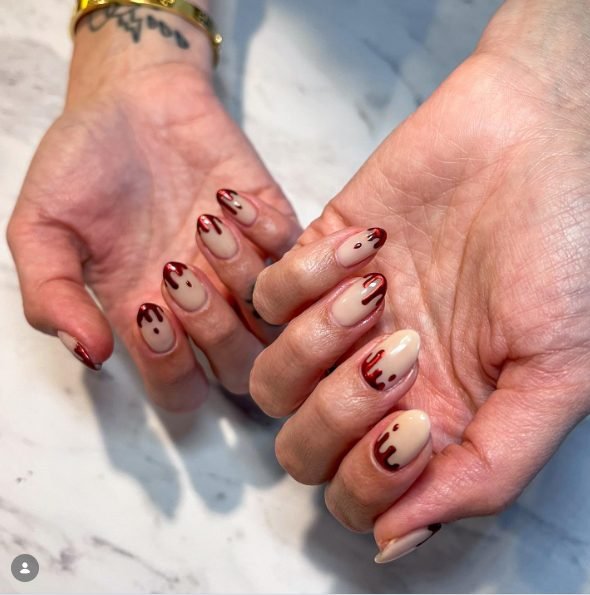
These nude nails have shiny red chrome drips running down from the tips, like dripping blood. A few drips have a single drop below them for extra effect. One nail is left plain nude, which gives the eyes a place to rest.
Best for: anyone who wants a spooky look that still feels polished and grown-up.
Recreate it:
- Paint a nude base and cure it.
- Paint drip shapes at the tip with a dark red gel. Use a thicker gel if you want raised drips.
- Cure, then add a no-wipe top coat over the drips and cure again.
- Rub red chrome powder onto the drips only.
- Seal with another layer of top coat and cure.
Make it work for you: The set in the photo is medium length. On short nails, keep the drips short and use only two or three per nail. For a version with no lamp, use a metallic red polish. It will not have a true mirror shine, but it still reads as drips.
Design source: @marnaenaenails
6. Pink Ghost and Drip Nails
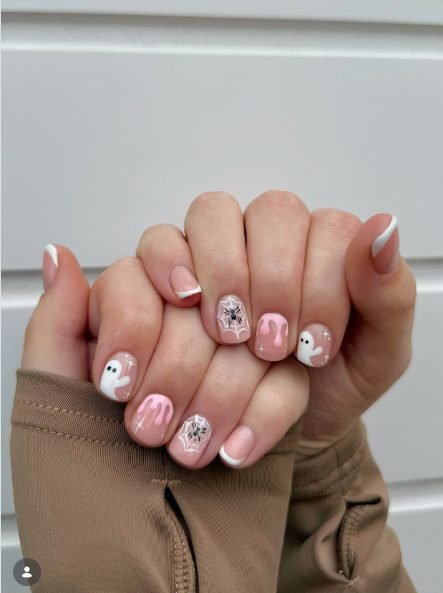
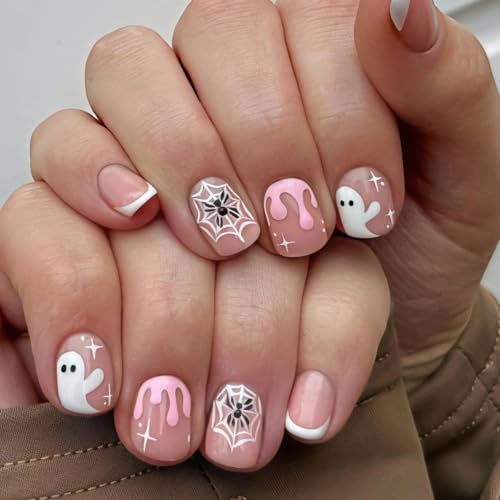
This set proves Halloween can be pink. The short nails mix white French tips, soft pink drips, little white ghosts and white spider webs with a tiny black spider. Small white sparkles tie all the nails together.
Best for: pink lovers who want Halloween nails that feel sweet, not scary.
Recreate it: The artist used The GelBottle BIAB in shade 19, plus Daisy (white) and Jet Black for the art.
- Apply a soft pink builder gel base and cure.
- Paint white French tips on two or three nails.
- Paint pink drips on one or two nails.
- Draw a white ghost with black eyes on one nail per hand.
- Draw a white web with a tiny black spider on one nail per hand.
- Add small white sparkles, then top coat.
Make it work for you: This design is already short and easy to wear. If the web feels too hard, use a web sticker instead.
Design source: @charlotteellennails
7. Pumpkin, Ghost and Flower Nails
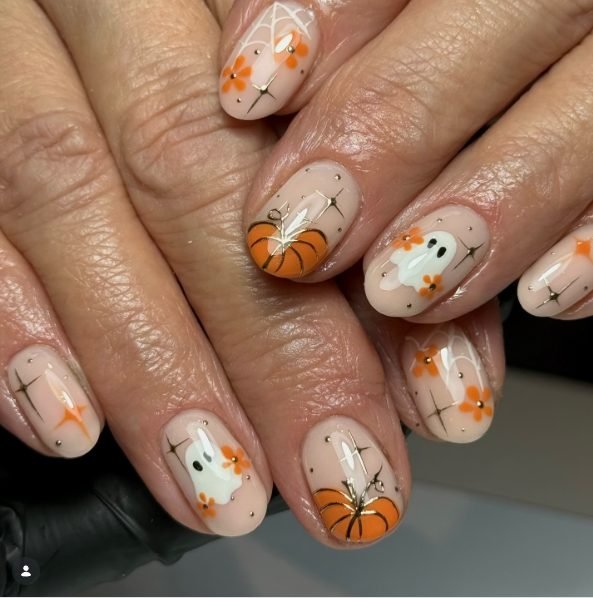
These short nude nails mix fall and Halloween in one set. You will see bright orange pumpkins with gold outlines, little white ghosts, orange flowers and white spider webs in the corners. Gold four-point stars and tiny gold studs add a soft sparkle.
Best for: anyone who wants one manicure that lasts from early October to Thanksgiving.
Recreate it:
- Apply a nude builder gel base and cure.
- Paint an orange pumpkin on one or two nails and outline it with gold.
- Paint a small white ghost with black eyes on one or two nails.
- Make orange flowers with five small dots around a center dot.
- Add white webs in the corners, gold stars and tiny gold studs.
- Seal with top coat.
Make it work for you: This set is already short. To save time, keep the pumpkins and ghosts on two nails and use only flowers and stars on the rest.
Design source: @bymiaf
8. Black, White and Orange Halloween Tips
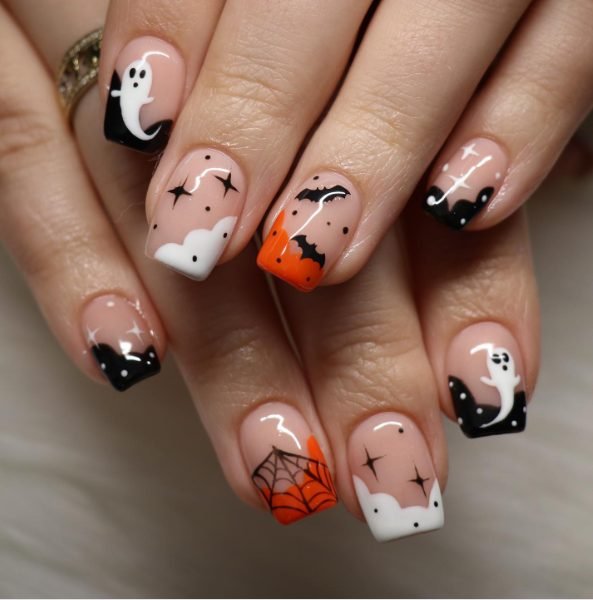
This square set uses the classic Halloween colors in a fresh way. Some nails have wavy black tips with white polka dots, while others have puffy white cloud tips. In between, you will find white ghosts, black bats on an orange tip, an orange spider web in one corner and tiny black stars.
Best for: anyone who loves traditional Halloween colors but wants a modern look.
Recreate it:
- Cover each nail with a sheer, natural-looking nude.
- Paint wavy tips in black, white or orange, choosing a different one for each nail.
- Add white dots on the black tips and black bats on the orange tip.
- Paint a small ghost or star on the nude part of some nails.
- Lock in the design with a shiny top coat.
Make it work for you: The nails in the photo are short to medium square. For shorter nails, file them down and make the tips thinner. The design still reads clearly because of the strong colors.
Design source: @dreamnailsbynhung
Try the free Nail Color Matcher
See which polish colors suit your skin tone. Free, no sign-up.
9. Retro Fall Ghost Nails
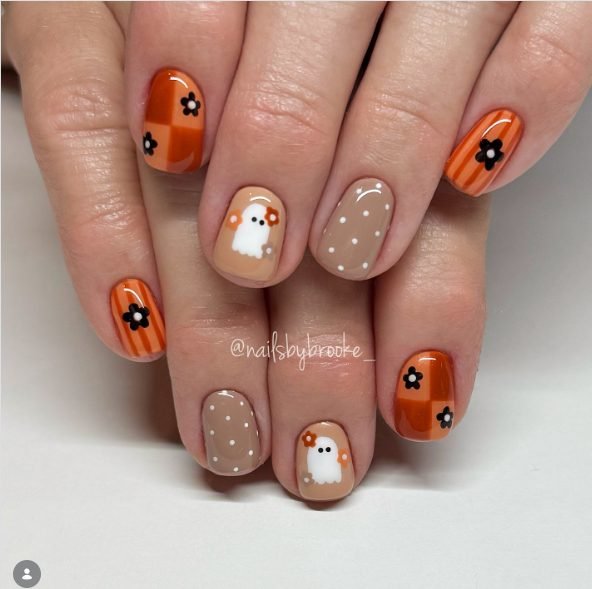
This short, round set feels like a cozy fall sweater with a Halloween surprise. Orange nails have checks or stripes with retro black flowers. Tan nails carry white polka dots or a sweet white ghost holding little orange flowers.
Best for: anyone who wants cute fall nails with just a touch of Halloween.
Recreate it:
- Paint two nails orange and three nails tan on each hand.
- Add stripes or a checkered pattern in a darker orange on the orange nails.
- Paint black five-petal flowers with a white center on the orange nails.
- Add white polka dots to one tan nail and a white ghost with flowers to another.
- Seal with a glossy top coat.
Make it work for you: This design was made for short nails. If the checks feel hard, use only stripes. They are easier to paint and look just as retro.
Design source: @nailsbybrooke__ (inspired by @style.by.nayla)
10. Summerween Nails
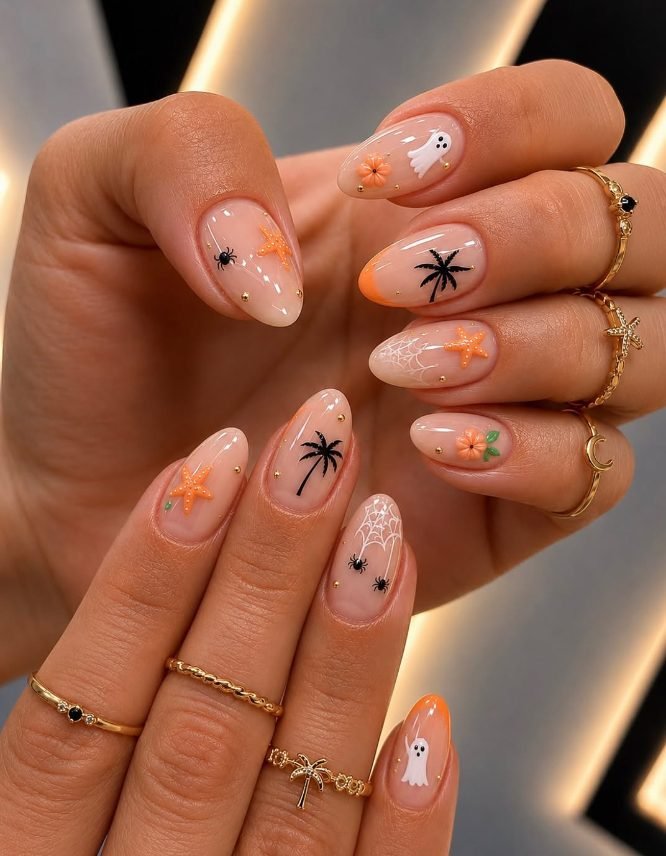
Summerween mixes beach vacation with spooky season, and this set does it perfectly. The nude nails show black palm trees, orange starfish, an orange flower with a green leaf, little ghosts, tiny spiders and white webs. Orange French tips and small gold studs finish the look.
Best for: warm-weather Halloween, beach trips in the fall, or anyone who is not ready to let summer go.
Recreate it:
- Start with a clear or sheer nude coat on every nail.
- Paint black palm trees and tiny black spiders on some nails.
- Add orange starfish and a small orange flower on others.
- Paint white ghosts and white webs on the rest.
- Add orange French tips to one or two nails, then gold studs and top coat.
Make it work for you: The photo shows medium almond nails. On short nails, use only one motif per nail, such as one palm tree or one starfish. Nail stickers for palm trees and starfish make it much quicker.
Design source: @slayedbygrace
11. Mummy, Pumpkin and Stitched French Nails
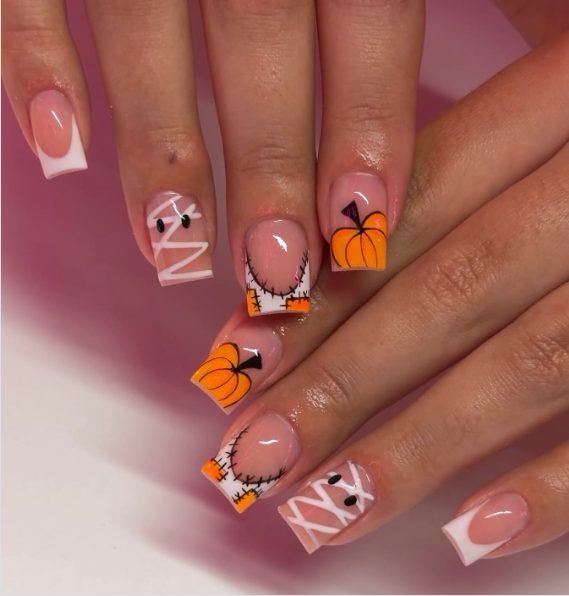
This playful short square set gives the French manicure a Halloween costume. There is a mummy nail with white criss-cross wraps and two black eyes, orange pumpkin tips, and patchwork tips with orange patches and black stitches. Plain white French tips on the pinkies keep it balanced.
Best for: anyone who loves the French manicure and wants to make it fun for October.
Recreate it:
- Paint a sheer nude base on all nails.
- Paint white French tips on the pinkies.
- On one nail, paint white criss-cross lines and add two black eyes for the mummy.
- Paint an orange pumpkin at the tip of one or two nails with a black stem.
- On the last nail, add small orange patches at the tip and draw black stitch lines.
- Seal with top coat.
Make it work for you: This design already fits short nails. For an easier version, do the mummy and pumpkin nails only and keep the rest as white French tips.
Design source: @ashleyjeannails
12. Deep Plum Nails with a Halloween Accent
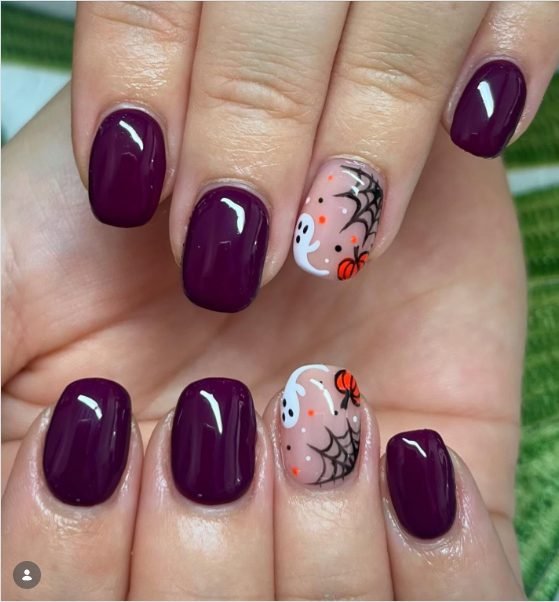
These short, glossy nails are painted in a rich deep plum. Only the ring finger gets Halloween art: a nude base with a white ghost, a black spider web, a tiny orange pumpkin and small orange and black dots. It is spooky, but only when you look closely.
Best for: beginners, office workers and anyone who wants a subtle Halloween look.
Recreate it: The artist used Magpie Beauty gel for this set.
- Paint four nails on each hand in a deep plum shade.
- Paint the ring finger nude.
- Draw a small white ghost, a black web and a tiny pumpkin on the accent nail.
- Add a few orange and black dots around them.
- Finish every nail with a glossy top coat.
Make it work for you: This is one of the easiest ideas on the list because only two nails need art. After Halloween, you can paint over the accent nail with plum and keep the manicure through November.
Design source: @nails_and_beauty_by_daisy (inspired by @truebeautybycarrie)
13. Candy Corn Swirl Nails with Ghosts
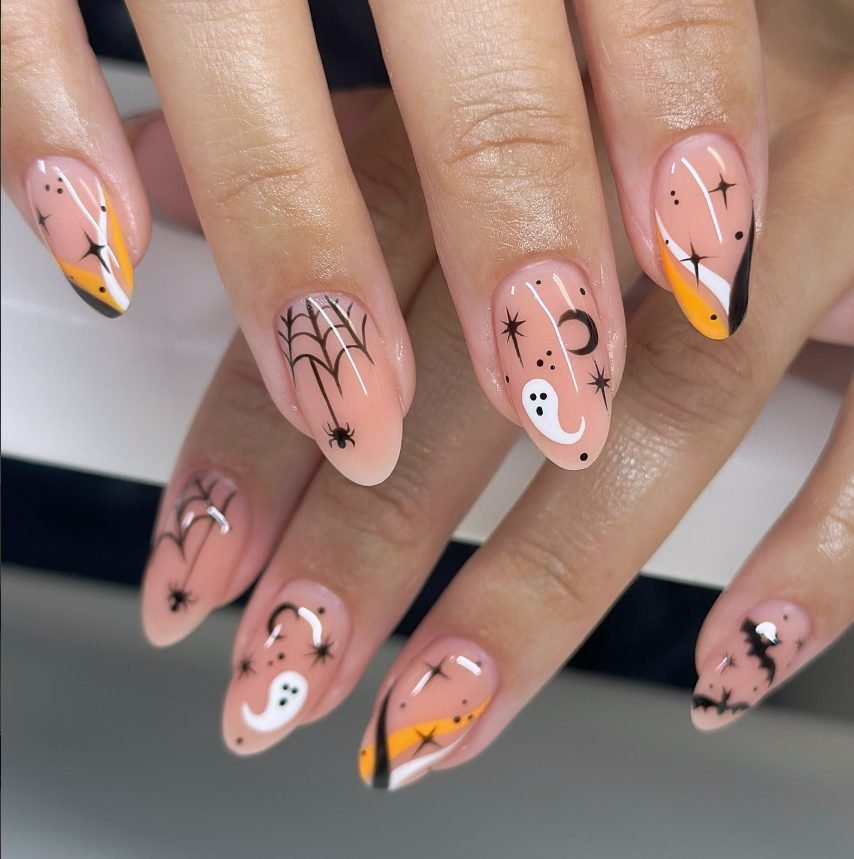
This set uses the colors of candy corn as swirling lines along the side of some nails. Other nails show a white ghost, a black spider web with a hanging spider, black bats, a crescent moon, four-point stars and tiny dots. The peach nude base keeps everything light and clean.
Best for: art lovers who want Halloween nails that look hand-painted and unique.
Recreate it: The artist made this as a structured gel manicure using Luminary Nail Systems in the shade Peace, with Kupa top coat, Cre8tion white and black, and Young Nails black liner.
- Build a peach nude structured gel base and cure.
- Paint a curved orange stripe along one side of a nail, then add white and black lines beside it.
- Draw a ghost, web, bat or moon on the other nails with a thin liner brush.
- Add black stars and dots to fill empty spaces.
- Seal with top coat.
Make it work for you: The photo shows long almond nails. On short nails, keep the candy corn swirl to one small corner and use one motif on the other nails. A striping brush makes the swirl lines much easier.
Design source: @sierrasnailstudio
14. Ghost Tips with Gold Chrome Stars
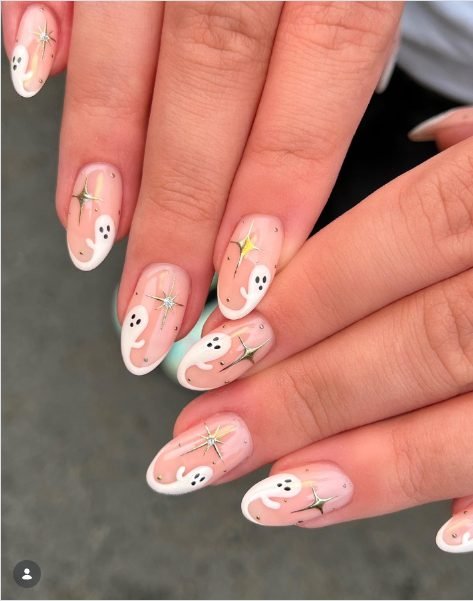
On these sheer pink nails, white ghosts peek up from the tips with little black eyes. Gold chrome four-point stars and tiny gold dots sparkle around them. The mix of cute ghosts and shiny gold makes the set feel festive and a little fancy.
Best for: anyone who wants cute Halloween nails with some sparkle for a party.
Recreate it: The artist hand-painted the ghosts with The GelBottle in Daisy and used Magpie Beauty gold chrome.
- Paint a sheer pink base and cure.
- Paint a white tip with round bumps along the top edge so it looks like a ghost rising up.
- Add two black dot eyes and cure.
- Paint small star shapes with a no-wipe top coat, cure, and rub gold chrome powder over them.
- Add tiny gold dots, then seal with top coat.
Make it work for you: The photo shows medium almond nails, but ghost tips shrink easily. On short nails, make the ghosts smaller and use one gold star per nail. Gold star stickers are a quick swap for chrome powder.
Design source: @nailsbyheather.errington
15. Black Spider Web and Blue Ghost Nails
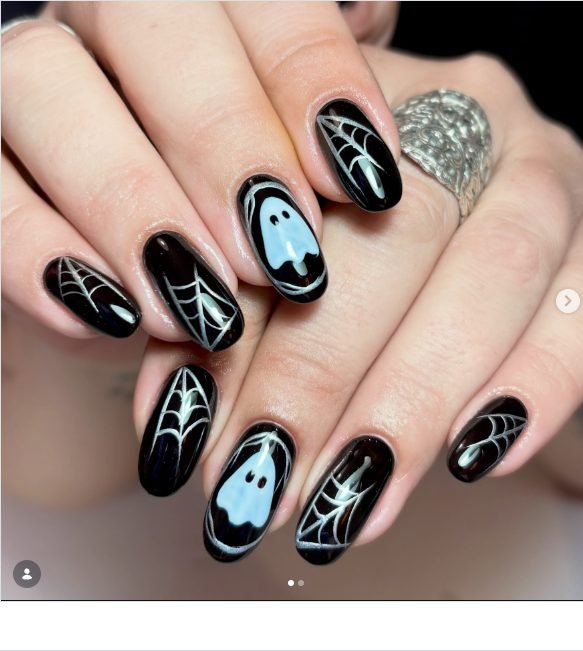
These glossy black nails are covered in silver-white spider webs that start from the corners. Two accent nails show a pale blue ghost framed by a white outline. It is the most gothic look on this list, but the soft blue ghosts keep it from feeling too dark.
Best for: anyone who loves black nails and a gothic Halloween style.
Recreate it: The artist used Dali Artistic products for this set.
- Paint every nail glossy black and cure.
- On most nails, draw three or four straight lines from one corner, then connect them with curved lines to make a web.
- On one nail per hand, paint a pale blue ghost with a white outline and black eyes.
- Finish with a high-shine top coat.
Make it work for you: Black looks great on short nails and makes them look neat. On short nails, draw the web from just one corner so it does not look crowded.
Design source: @gelbyjay
Which Short Halloween Nail Design Should You Pick?
| If you want… | Try |
|---|---|
| No nail art at all | #1 Matte Black and Red Ombre |
| Something easy for a beginner | #12 Deep Plum with a Halloween Accent |
| Office-friendly Halloween nails | #1, #2 or #12 |
| Cute, not scary | #4, #6 or #14 |
| Pink Halloween nails | #6 Pink Ghost and Drip |
| Classic black and orange | #8 Black, White and Orange Tips |
| A fall look that lasts into November | #7 or #9 |
| Dark and spooky | #5 Red Chrome Drips or #15 Black Spider Web |
| Lots of fun detail | #3 Confetti or #10 Summerween |
Tips for Doing Short Halloween Nails at Home
- Start with a nude or sheer pink base. Small art stands out more, and regrowth is harder to see.
- Use one or two accent nails. You get the Halloween look with half the work.
- Keep motifs small. On short nails, one ghost or one pumpkin per nail looks cleaner than five tiny shapes.
- Buy three simple tools. A dotting tool, a thin liner brush and a pack of Halloween nail stickers cover almost every design on this list.
- Seal the art well. Nail art chips first at the tip, so swipe top coat along the free edge of each nail.
- Pick the right polish. Gel lasts about two to three weeks, while regular polish lasts about a week. See our guide to the 27 types of nail polish to choose the best one for you.
Frequently Asked Questions
Can you do Halloween nail art on short nails?
Yes. Short nails are great for Halloween art. Keep each design small and use simple shapes like ghosts, pumpkins, bats and spider webs. One motif per nail looks cleaner than many tiny details.
What are the best colors for short Halloween nails?
Black, orange, white and deep plum are the classic choices. Nude and soft pink bases are also popular because they make small art stand out. Red works well for drip and ombre designs.
What is the easiest Halloween nail design for beginners?
A solid color with one accent nail is the easiest. Paint most nails plum or black, then add a sticker or a simple ghost to the ring finger. Dots made with a dotting tool are also very beginner-friendly.
How can I make Halloween nails look classy?
Choose a dark shade like deep plum or black, use a matte or chrome finish, and keep the art to one or two nails. Designs like the matte ombre, red chrome drips and smoky black edges feel spooky without looking like a costume.
How long does Halloween nail art last?
Gel nail art usually lasts about two to three weeks. Regular polish with nail art usually lasts about five to seven days. A good top coat, refreshed every few days, helps any design last longer.
When should I get my Halloween nails done?
If you use gel, book your appointment about one week before Halloween so your nails look fresh on the day and last through the weekend. With regular polish, paint them one or two days before.
Final Thoughts
Short nails and Halloween are a perfect match. Whether you like cute ghosts, spooky drips or a simple dark shade, there is an idea here for you. Pick one design, save the photo, and show it to your nail tech or try it at home with a few simple tools.
Looking for more spooky inspiration in every length? Browse our Halloween nail ideas for even more looks.